Memory Representation
Images with short Memory representation can be converted to float by the Convert to Float button. This requires more RAM, but avoids rounding problems.
Edit the Image Origin
The Origins area shows the coordinate of the image origin and allows setting it to a different location. The origin is relevant for the definition of volumes-of-interest, because they are defined relative to the origin. They are also relevant for image fusion. In hybrid imaging, the origin of the different modalities is set to the same anatomical location, so that the images can be aligned by simply aligning the origins. An origin of (0,0,0) indicates the upper left corner of the first slice.
The Origins radio button has three positions with the following meaning.
▪Original: With this setting the origin obtained with data loading is used. This is the standard setting.
▪Center: By selecting this button and activating Sets Origins, the center coordinate of the data volume is defined as the new coordinate origin.
▪Defined: When this button is set, the origin coordinate can be entered manually into the X, Y and Z fields, for instance the values from an other study. As an alternative, the triangulation point can be set to the intended location of the origin, and then the button Get from Hotspot activated. This will transfer the triangulation coordinate to the origin to the pixel. Sets Origins has to be activated for making the coordinates actual.
Edit the Pixel Size
The X, Y and Z fields of Pixel Size shows the current pixel size. To change them edit the values and then activate Set Pixel Size.
Edit Value Units
The Value Units selection contains the list of supported image units. To change the units select the correct unit from the list, and then activate Set Units. Note that only the interpretation of the values is changed, but that there no scaling applied to the data values.
Edit Frame Times
Correct acquisition times are very important for using dynamic data in a quantification process. The times can be inspected and overwritten using the Edit Frame Times button, which shows the dialog window below.
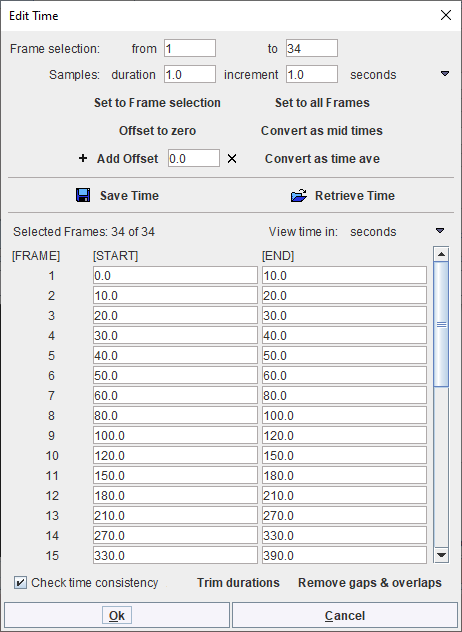
Note the Save Time/Retrieve Time buttons which allow saving/retrieving the timing of the dynamic frames to/from a file. If changes are required, the values can be overwritten and then saved with the Ok button.
View Slice Times
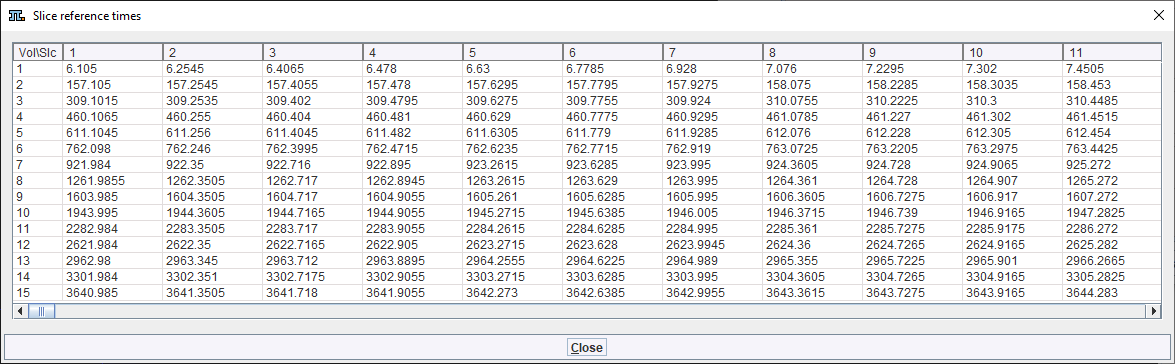
In some situations the slices in an image volume can have different timing, for instance when using a scanner with limited axial field to acquire dynamic whole-body data by multiple passes. As encoding of such timing information in the data may be vendor-dependent, the View Slice Times button allows inspecting the timing PMOD extracts from such data.
A dialog window is opened which lists the reference time per slice (horizontal) and frame (vertical). In the example below is apparent, how the slice reference times increases starting from slice one due to the continuous acquisition mode. The frames are separated by about several minutes representing the time between the passes.
View Slice Positions
The View Slice Positions button opens a viewer to inspect the slice positions. When orientation is defined in the image file, the slices orientation (the direction cosines for the image rows and columns) is available.
