When loading DICOM data, the directory of the last DICOM loading operation is referred to. If the Skip scan at start box is not checked, PMOD searches for DICOM images in the directory when the dialog windows opens. In case there are many files in a directory, the scanning process may take substantial time. This is annoying if the data to be loaded resides somewhere else. To avoid initial file scanning, the Skip scan at start box can be checked. The user can then locate the proper directory with the Change Folder button and activate the ![]() button to initiate scanning for DICOM files. If no DICOMDIR exists, all files of the directory are scanned and all valid DICOM series listed.
button to initiate scanning for DICOM files. If no DICOMDIR exists, all files of the directory are scanned and all valid DICOM series listed.
If a DICOMDIR file exists in the directory, it is parsed and the registered image series presented for loading. As a consequence, all non-registered DICOM files in the same directory are neglected.
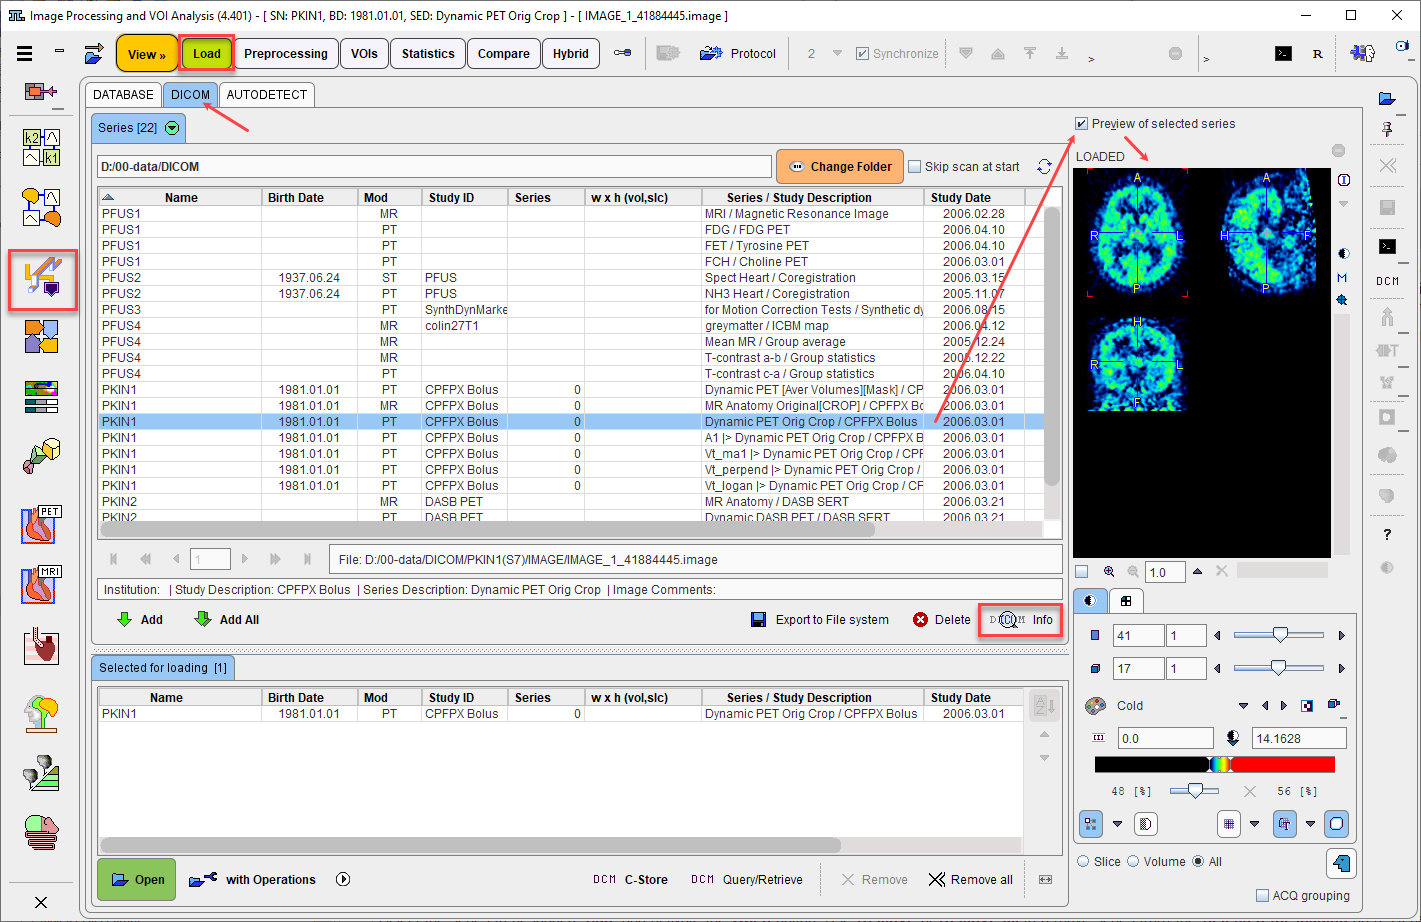
The DICOM loader presents the selection of the available image series in a dialog window as illustrated below.

Select the series to be loaded, Add, and activate the Open button. Use Remove or Remove all to remove series from the Selected for loading area. Depending on the context, several series can be loaded at once, or the selection is restricted to a single series. Please note the with Operations button. If it is activated, the dialog window specifying loading transformations explained below is opened.
Sometimes the information shown in the list may be insufficient to identify a series unambiguously. To find out more about the selected series activate the DICOM Info button which opens a full DICOM data inspector. Another alternative is to use the Image Preview to the right: if the Preview of the selected series box is checked, the images are loaded as soon as a series is selected.
To modify the list order use the Sort by selected column button ![]() or Up
or Up ![]() and Down
and Down ![]() buttons , or Remove
buttons , or Remove ![]() a file. Optionally, Remove all using the
a file. Optionally, Remove all using the ![]() button allows removing all images available in the Selected for loading area.
button allows removing all images available in the Selected for loading area.
The ACQ grouping box allows grouping the images in the selected series by the acquisition number, an optional sub-level beneath the preview panel. This is required to properly load some DICOM series, for example with CT studies which contain different reconstructions (different area/pixel) in a single series. With other series, however, acquisitions need to be displayed together, for example with whole body SPECT data covering subsequent bed positions in separate acquisitions. As there is no way for PMOD to determine the right interpretation, the user may choose between the two loading modes to solve unsatisfactory loading results.
DCM Query/Retrieve starts the dialog window for querying a remote DICOM node and pulling images from it as explained above.
DCM C-Store is a utility for sending selected data sets directly to a remote DICOM server without the need to open it for viewing, and then selecting the C-Store saving button. Direct sending has the advantage that the original DICOM images are transferred. Otherwise, if loaded images are sent, they contain information modified by PMOD.
Use the Delete button to remove all files belonging to the currently selected series from the disk.
Use the Export to File System to copy the selected series files to a target directory.
Note: A new DICOMDIR including all DICOM studies in a directory tree can be generated using the Create DICOMDIR entry in the menu of the PMOD viewing tool (PVIEW).