Reslicing after Loading
When loading an input study, the images automatically get resliced to the Reference resolution, whereby the program tries to align the two studies. If there are common DICOM landmarks available (Origins), they are aligned, otherwise the centers of the two data volumes are aligned. The result of this initial reslicing is shown in the CoRegistration area in the lower left fused with the Reference image. If multiple studies are loaded, this procedure is performed for each input independently.
The results of the matching initialization can be inspected in the CoRegistration panel by clicking at different points in the images. Note that they are synchronized with the upper reference images (as long as Synchronization box from the bottom status line is checked).
Automatic Initialization Variants
The Matching Initialization panel provides options to easily modify the properties of initial reslicing.

The following buttons are available. If the initial alignment is poor, please try them out to get a better result to start with.
Hot Spots |
This button needs to be used in combination with the orthogonal views of the Reference and the Reslice studies. The cross indicating the hot spot should be placed at the same anatomical landmark, as illustrated below. |
Center |
This button brings the centers of both image volumes into agreement. It is the preferred mode if the coordinate origins are distinct, but the studies cover (about) the same anatomical volume. |
Origins |
This button brings the origin of the coordinate system in both data sets into agreement. It works successfully if the same origin based on a common landmark has been defined in both studies, e.g. in a hybrid PET/CT study. |
Gravity |
This button brings the origin of the centers of mass in both data sets into agreement. |

All of these initialization buttons calculate and apply an initial Move transformation, which can be inspected in the panel.
Interactive Adjustments of Initialization
If none of the automatic initializations provides a reasonable starting point for the automatic procedure, the alignment can easily be manually adjusted. To this end activate the button in the CoRegistered image area illustrated below.
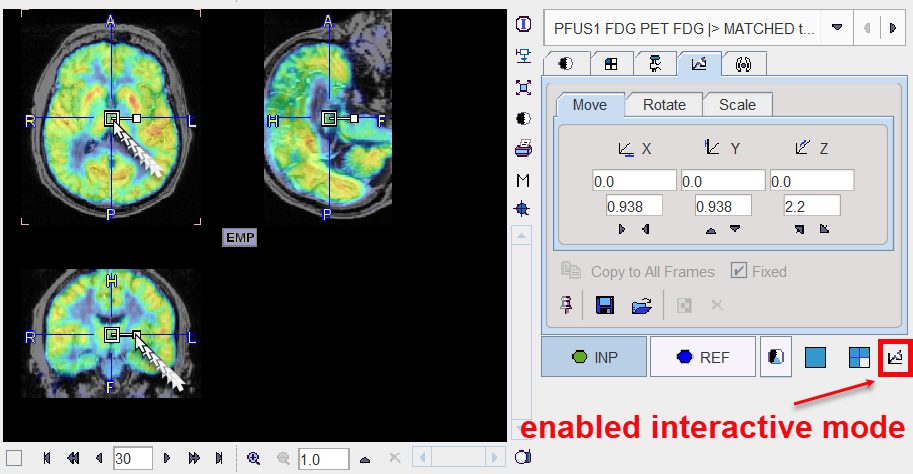
Now the selected reslice series can be shifted and rotated using the corresponding handles as explained below.
Manual Initialization
The reslicing panel of the INP image illustrated above shows the result of the initialization operation. However, the transformation parameters can also be set manually, for instance if the images to be registered always have the same constant offset. In these cases the initialization can be saved using the Save icon ![]() once, and then retrieved using the Load
once, and then retrieved using the Load ![]() buttons the next time images have to be matched. Note that these settings can be applied to all loaded images with the Apply Initial to All Inputs button.
buttons the next time images have to be matched. Note that these settings can be applied to all loaded images with the Apply Initial to All Inputs button.
Dynamic Image Series
Dynamic series may become huge when resliced to anatomical reference images with high resolution. Therefore, with the Transform all frames box, the reslicing behavior can be modified. If the box is checked, all frames of the dynamic input series will be resliced to the reference, creating again a dynamic series. If the box is not checked, only the frame currently selected in the Input area is resliced, resulting in a static series. This is the recommended mode at least for the initialization phase.
Selective Frame Alignment of Dynamic Series
Static image series naturally have only one transformation associated with them. For dynamic series, however, PFUS supports one transformation per frame. In the CoRegistration pane, the user can chose to transform all frames at once, or to operate on individual frames. This behavior is controlled by the Fixed box on the reslicing pane. If Fixed is checked, all frames share the same transformation. If Fixed is not checked, the user only works with the current frame. When selecting a new frame, he can adjust the transformation without changing that of the prior frame. The Copy to All Frames button allows copying an individual transformation to all frames of the series. This function could be used to initially establish an "average" correction of all frames, and then apply fine-tuning for the individual frames.

Reslicing Option in the Status Bar
![]()
The Reslicing method choice in the status bar lets the user define how image values are interpolated from the original pixel values when new slices are calculated. Default is Trilinear which is a simple and fast interpolation using all 8 enclosing pixel values. Cubic Spline is the best interpolation regarding accuracy and speed. The truncated sinc interpolations Sinc (Window 5) and Sinc (Window 7) are more accurate, but considerably slower. Nearest neighbor interpolation just uses the value of the closest pixel, so it is very fast but in most cases does not provide satisfactory quality. However, it is the method of choice if an object map image containing integer values needs to be resliced.
The appropriate interpolation value for pixels which were outside the original field-of-view is unknown. Per default a NaN value is applied, but the behavior can be changed with the selection
![]()
to use the Minimum of the data set (more adequate for CT data) or a fixed value of 0.
The third selection is used only if elastic transformations are applied.
![]()
It determines, what image property is maintained. With Concentration the regional concentration average will be the same before and after image transformation.
With Total Amount the image intensities are scaled by the amount of contraction/dilation that occurs during spatial normalization. As a result, the total amount (= average*volume) of a region remains constant. This option should be applied for a segmented MR image which is used for voxel-based morphometry (VBM). In this case, the total amount corresponds to the grey matter volume.
Note that the interpolation choice has an impact on all calculations in the fusion tool.