The purpose of motion correction is to correct the image time frames of a dynamic study for relocations due to patient motion.
To start motion correction please begin by first selecting the Motion Correction tab or the ![]() button in the taskbar. As a consequence, the load Input button of the Reslice images gets active as shown below, and the study to be motion corrected can be loaded.
button in the taskbar. As a consequence, the load Input button of the Reslice images gets active as shown below, and the study to be motion corrected can be loaded.

The next step is to configure the different elements of motion correction using the interface elements which have now become active.
Reference image for Motion Correction
The Reference for matching is defined with the upper part of the panel:
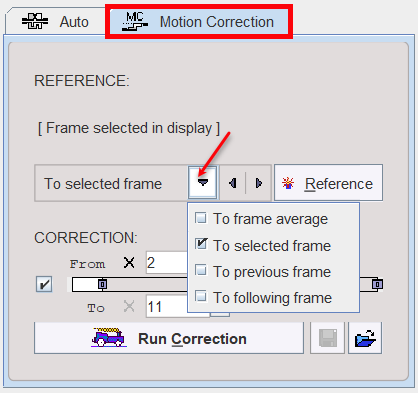
The following options can be selected from the list:
Averaged |
An average image is calculated from a range of frames and serves as a static Reference for the correction of the frames. The average can be calculated from all frames, or from a sub-range as defined by the upper From To range. For finding out a range of frames with negligible patient motion it is recommended to review the frames beforehand in the movie mode (see below). |
Selected |
The frame shown in the upper right image window will serve as the Reference. Please note that if the tracer distribution changes significantly over time it will be difficult to motion correct successfully using a single frame. The use of markers is a way to potentially alleviate this problem. |
Previous |
In this mode, motion correction matches each frame to its previous with the advantage that the changes in spatial tracer distribution are less of a problem. On the other hand, successive matching errors might accumulate with this strategy. The final transformation per frame is obtained by combining the transformation matrices of all preceding frames. In this way multiple interpolations in the final image reslicing are avoided. |
Following |
This is the same principle as the Previous mode, but the method works from the latest frame in the selection through the earliest one. |
After the Reference configuration has been completed, please activate the CreateReference button to initiate creation of the Reference image, which is then shown in the upper left image section. Creation of the Reference can be repeated until a satisfactory Reference has been found.
Correction Range
Next configure the range, wherein motion correction will be performed. A reason to exclude a range of frames may be the lack of signal in the initial frames, and/or frames with a short acquisition duration during which patient motion is less likely. Excluded frames will be copied to the corrected series without changes, and the correction matrix of these frames will contain zero for all rotations/translations. If adequate, check the second From .. To range box and define the correction sub-range.
Starting Motion Correction
To start motion correction, activate the Run Correction button which becomes active as soon as a Reference has been created. It brings up the rigid matching dialog, allowing to modify the matching parameters. All rigid matching methods are available. When the Match button is activated, motion correction starts, and the result is shown in the lower left section. Shown below is the result of motion correction with the demonstration study (containing markers).

The motion corrected study can be saved in a format of your choice using the CoReg button. The motion correction transformations can be saved/retrieved using the corresponding buttons on the Motion Correction pane.
Control of Motion Correction Quality
To check the quality of the applied motion correction we propose the following procedure:
▪use a fixed range ![]() of the color table and set the minimum/maximum value to a globally reasonable value;
of the color table and set the minimum/maximum value to a globally reasonable value;
▪select the movie tab, enable Frames looping, and start the movie. If necessary, use the reduce speed / single step buttons to examine the corrected study.
The movie player allows showing movies of slice images through the volume or through time (dynamic studies only), as well as rotating MIPs if the 3D button was selected in the layout.
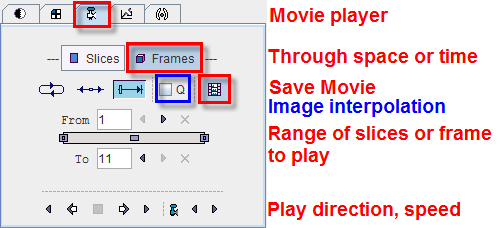
Please use the Q box to enable image interpolation when working with low-resolution images. If the save movie button is activated at the time the user hits the start button, a dialog window appears requesting information for movie generation.

The movie formats include Quicktime or DICOM, and the active image or the entire image viewport can be captured. The movies are generated from intermediate JPEG files, which can optionally be kept for other uses.
A movie of the active image can also be started/stopped with the CTRL+M shortcut without the need to open the movie tab.