The configuration panel houses properties defining how the VOIs are displayed in the image overlay.
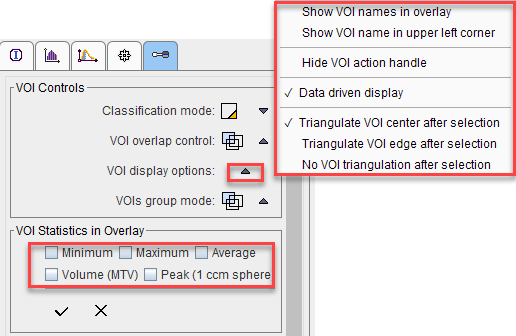
The following properties can be configured in the option menu:
Show VOI names in overlay |
Shows the VOI names next to the contours in the image overlay. |
Show VOI name in upper left corner |
Shows the names of the VOIsin the upper left corner section at the top of the image. Overlapping regions are shown as a list of names. |
Hide VOI action handle |
Hides the handle for moving the VOI to avoid obstructing the view with small VOIs. The VOI shifting/rotation operations have to be performed with the keyboard arrow cursors. |
Data Driven Display |
Determines the behavior of the image layout when switching between different series. If the box is checked, each image has its own properties such as layout, zoom, color etc. Otherwise, the images are shown with the same layout properties. |
Triangulate VOI center after selection |
Updates the position of the cross lines in the display at the center of the selected VOI in the list |
Triangulate VOI edge after selection |
Updates the position of the cross lines in the display at the edge of the selected VOI in the list |
No VOI triangulation after selection |
The position of the line is not updated in the |
Usually contours are outlined on images displayed with interpolation, often combined with image zooming.
![]()
In such a representation the images look smooth, even if the original pixels are big as with modalities suffering from low spatial resolution relative to the structure being outlined. To make sure that the right pixels are included in the VOI it is recommended - especially for small structures - to examine the VOI pixels as follows:
1.Check the S box. The display shows only the contours of the currently selected VOI to avoid confusion in the presence of multiple VOIs.
2.Check the ![]() icon. The VOIs vertexes are hidden.
icon. The VOIs vertexes are hidden.
3.Check the Fill box. The display now shows a grid with the VOI pixels (G). The grid can also be filled by setting the radio button to A (opaque filling). The degree of opacity can be change using the UP arrow ![]() right to the A button, whereby 100% indicates full opacity.
right to the A button, whereby 100% indicates full opacity.
4.Disable image smoothing by disabling the
![]()
button in the image control section.
5.Modify the VOI contours with the Fill box checked, for instance by moving a vertex. The grid is updated as soon as the changes are completed.

Note: PMOD only considers the pixels for the statistics calculation which are visualized with the Fill functionality.